
-
Best Adhesive for Vitrified Tiles: How to Choose Correctly
-

Introduction
The tiles are laid. The site looks clean. But six months later, the complaints start, a hollow sound underfoot, edges lifting at the corners, entire tiles debonding from the wall. The contractor is called back. The client is unhappy. And somewhere in the middle, the question surfaces: what went wrong?
In most cases, the answer isn't poor workmanship. It's either the wrong adhesive or the right adhesive used without understanding what the tile actually demands.
This guide is written for tile contractors, site engineers, and project managers working with vitrified tiles in India. It covers how to select the correct adhesive for vitrified tiles based on tile size, substrate type, application area, and site conditions, so the installation holds the first time
Why Vitrified Tiles Need Tile Adhesive
Walk through enough sites and you will hear the same complaints repeated: tiles giving a hollow sound when tapped, corners lifting after a few months, full tiles dropping off external walls in the second monsoon season. These are not random failures. They follow a pattern.
The most common causes of vitrified tile failure on Indian construction sites are:
Insufficient adhesive coverage on the tile back, tiles are fixed with only 40–50% contact area when the minimum should be 80%
Using cement slurry or sand-cement mortar, which cannot chemically or mechanically bond to the smooth, low-porosity surface of vitrified tiles
Applying the same adhesive grade for floor and wall applications, ignoring the different pull and slip resistance requirements
Skipping movement joints on large floor areas, causing stress to build up and pop tiles
Using a standard adhesive for exterior walls exposed to thermal cycling and monsoon moisture
None of these are difficult to fix. But they require making the right decisions before the tile goes down, not after. Most failures can be prevented by following propertile installation practices from the start.
Why Vitrified Tiles Need a Specialized Adhesive (Not Cement Mortar)
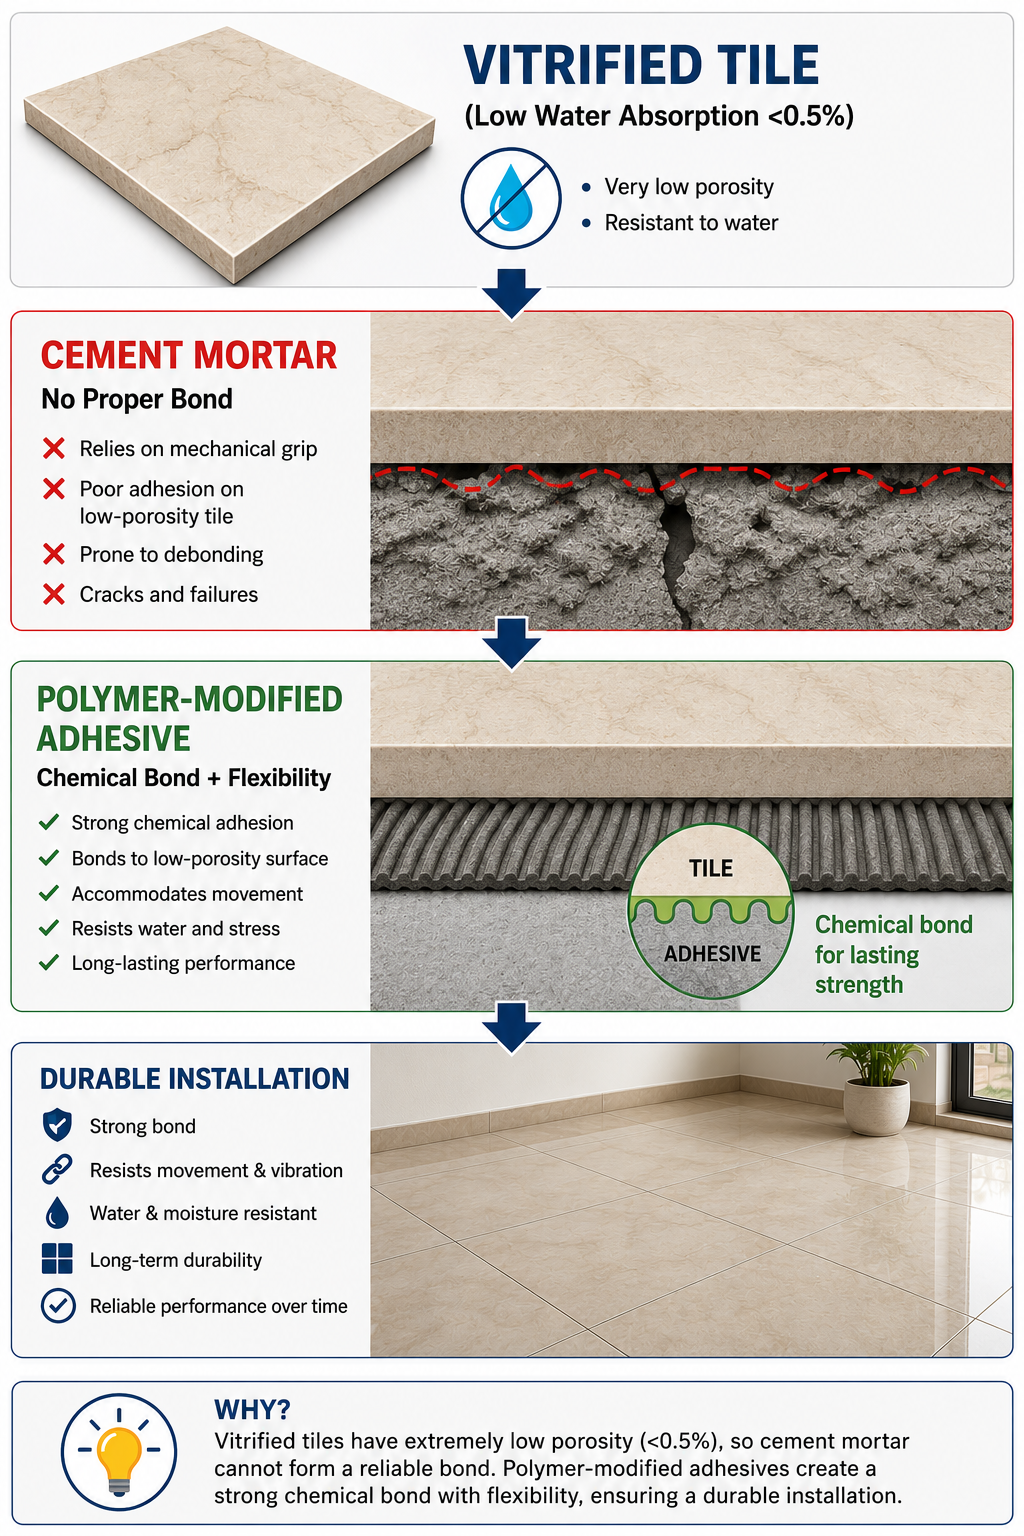 Vitrified tiles are manufactured through a vitrification process that combines silica and other raw materials at high temperature, producing a tile with a water absorption rate of less than 0.5%. This near-zero porosity is what makes them stain-resistant, hard-wearing, and visually consistent.
It is also why cement mortar fails to bond them.
Conventional sand-cement mortar bonds to porous surfaces by penetrating the surface and forming a mechanical key. Vitrified tiles offer no such porosity. Cement slurry applied to the tile back simply sits on the surface without true adhesion. It may feel firm initially, but it will debond under thermal movement, moisture change, or point loading.
Vitrified tiles require polymer-modified tile adhesive because conventional mortar cannot bond to their low-porosity surface. Selecting the appropriate tile adhesive for the application is critical for preventing debonding and long-term failures. The adhesive chemistry matters more than the tile brand.
Polymer-modified tile adhesives work differently, and understanding tile adhesive types helps explain why they perform better than conventional mortar on low-porosity surfaces. The polymer additives allow the adhesive to form a chemical bond with the tile surface rather than relying on surface penetration. They also provide a degree of flexibility that accommodates minor structural movement and thermal expansion, both of which are significant in the Indian climate, where site temperatures can swing 30–40°C between seasons.
Adhesive chemistry, not tile price, is what determines whether vitrified tiles stay fixed.
Common Mistakes When Selecting Adhesive for Vitrified Tiles
Most vitrified tile failures can be traced back to one of the following selection errors at the procurement or planning stage:
Choosing adhesive only by price
Tile adhesive is a small cost relative to the overall tile and labour budget. Choosing a substandard adhesive to save a few hundred rupees per bag often results in rework costs that are ten times higher. The right adhesive for vitrified tiles is not the cheapest one, it is the one matched to the tile type and application.
Ignoring tile size
Larger tiles have more mass and a greater surface area, which means greater stress concentration at the bond line. A tile adhesive that works for 300×300 mm ceramic may not provide adequate strength for an 800×800 mm vitrified slab.
Using the same adhesive for floors and walls
Wall tiles require an adhesive with anti-slip (non-sag) properties to prevent tiles from slipping down during installation before the adhesive sets. Floor adhesives are not formulated for this. Using a floor adhesive on walls leads to tiles slipping during laying and potential long-term bond failure.
On-Site Insight: Most vitrified tile failures occur due to insufficient adhesive coverage on tile backs not adhesive quality alone. Always check for minimum 80% contact area when tiles are pulled up during inspection.
How to Choose the Right Adhesive for Vitrified Tiles
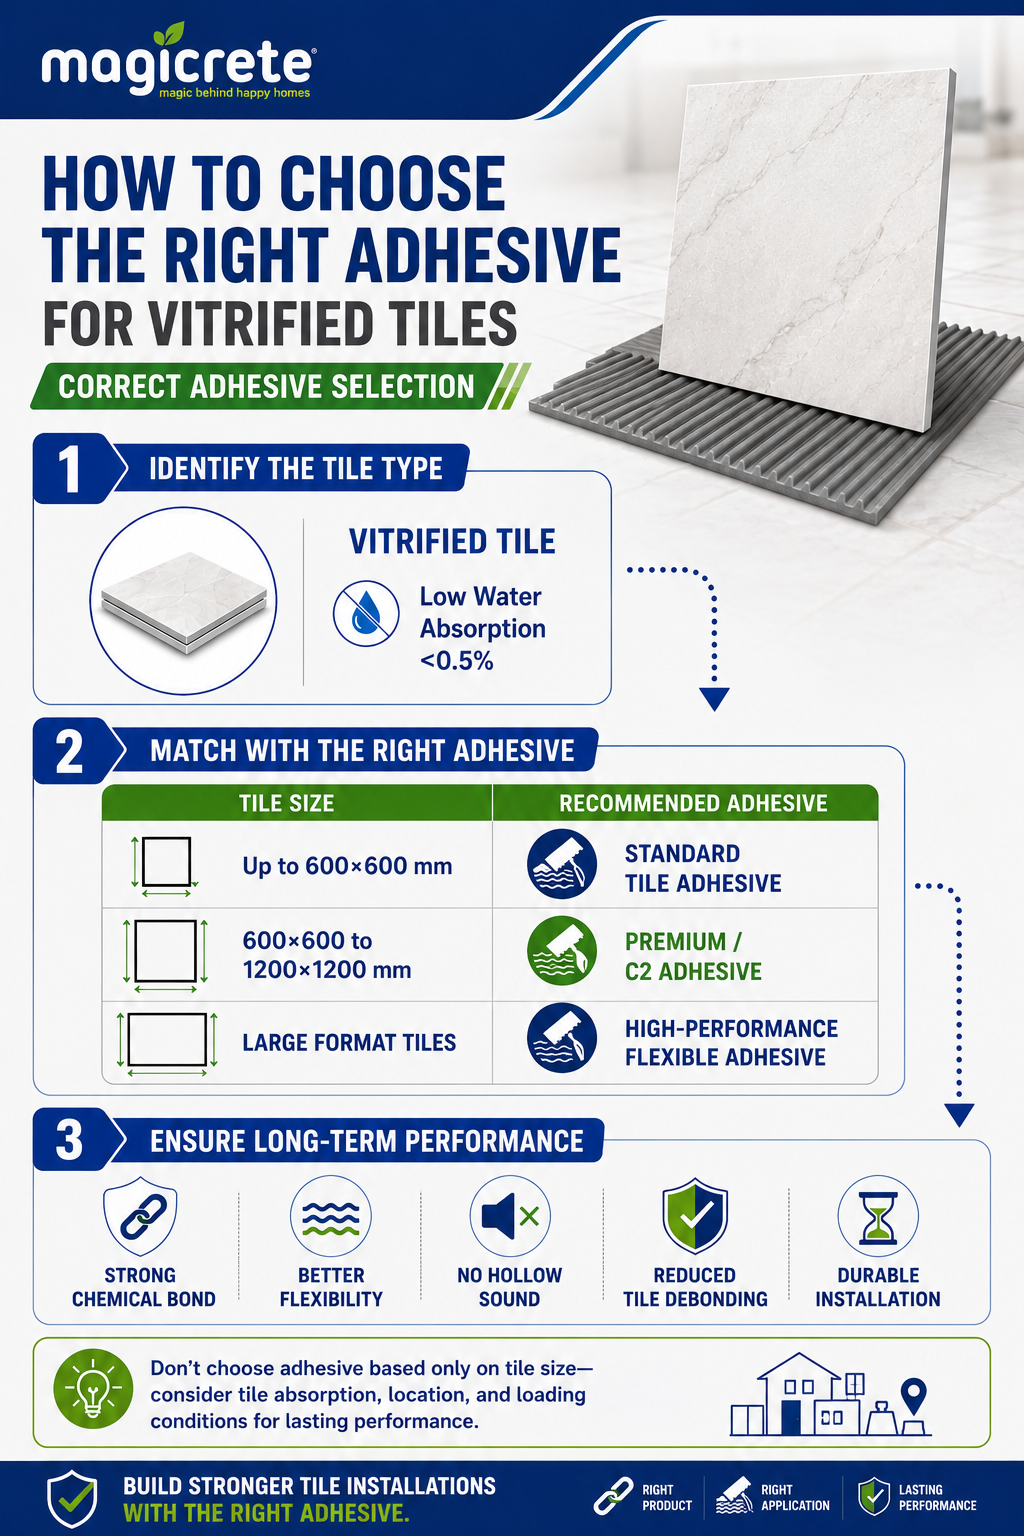 Adhesive selection for vitrified tiles is a three-variable problem. Installers can use the tile adhesive selector to identify suitable products based on tile size, substrate and application conditions: the tile itself (size, weight), the substrate (what you are fixing to), and the application environment (interior, exterior, wet, dry). Each variable narrows down the correct specification.
Tile Size and Load Considerations
Tile size is the most important factor in adhesive selection. Choosing tile adhesive based on tile size and installation conditions is essential for achieving long-term bond performance. As tile format increases, the adhesive must do more work: it must distribute load evenly, resist point stress, and accommodate the greater thermal movement of a larger tile area.
- Tiles up to 400×400 mm: Standard polymer-modified adhesive (C1 grade) is generally adequate for dry interior applications
- Tiles 600×600 mm to 800×800 mm: Higher strength adhesive (C2 grade) with improved open time to allow proper coverage and adjustment
- Large format tiles above 800×800 mm and vitrified slabs: Require C2TE-rated adhesive (with deformability) and mandatory back-buttering, adhesive applied both to the substrate and the tile back
Back-buttering is non-negotiable for large format vitrified tiles. Applying adhesive only to the floor or wall and pressing the tile down will leave voids in the contact area, particularly at the centre of a large tile. These voids create stress concentration points that lead to cracking and debonding over time.
For tiles heavier than 20 kg/m², also factor in the substrate's ability to carry the dead load and verify adhesive shear strength against tile weight per IS 15477.
Substrate Type Matters More Than You Think
The adhesive must be matched to what it is bonding to not just to the tile itself.
Concrete or RCC surface: Use a standard polymer-modified tile adhesive. Surface must be cured (minimum 28 days), clean, and free of laitance. Priming may be required for high-suction surfaces.
Sand-cement plaster: Commonly used for internal walls. Allow full curing before tiling. Moisture content should be below 3%. Use an adhesive appropriate for the plaster porosity.
Existing tiles (tile-on-tile): Not all adhesives are suitable for tile-on-tile applications. Confirm the adhesive is specifically rated for non-porous substrates. The existing tile surface must be intact, well-bonded, and degreased. This is common in Indian renovation projects where breaking old tiles is structurally or practically difficult.
Gypsum board or drywall: Requires a lightweight, flexible adhesive. Standard cementitious adhesives may be too heavy or rigid for board substrates.
Surface preparation is as critical as adhesive selection. A correctly specified adhesive applied to a dusty, oily, or unsound substrate will still fail.
Interior vs Exterior Use: Movement, Moisture & Stress
Interior and exterior environments impose very different demands on a tile adhesive:
Interior floors: Adhesive must resist compressive and shear loads from foot traffic. Open time should be sufficient to allow full coverage adjustment, especially on large tiles. Standard polymer-modified adhesives perform well in dry interior conditions.
Interior wet areas (bathrooms, kitchen backsplash): Adhesive must be water-resistant. Consider adhesives with enhanced moisture resistance, and use epoxy or polymer grout at joints to prevent water ingress.
Exterior walls and facades: Thermal expansion and contraction cycles cause continuous stress at the tile-adhesive-substrate interface. Monsoon moisture exposure introduces cyclic wetting and drying. Exterior applications require a flexible, deformable adhesive (C2TE or higher) rated for outdoor use.
Exterior floors and terraces: Subject to water ponding, thermal movement, and freeze-thaw cycles in some regions. Require adhesives with high shear strength and good water resistance, plus movement joints at maximum 3m intervals.
A tile installation that works perfectly on an interior floor will fail on an exterior wall if the same adhesive is used without accounting for thermal and moisture exposure.
Wet Areas and High-Moisture Zones: Bathrooms, Kitchens, Balconies
Wet areas deserve specific attention because they combine two demanding conditions: constant or frequent moisture exposure and, in the case of balconies, outdoor thermal cycling as well.
For bathroom floors and walls, the adhesive must not re-emulsify in the presence of water after curing. Standard cementitious tile adhesives resist moisture well once fully cured, but the grout joints and tile edges are the more common entry points for water. Ensure adhesive coverage is complete, gaps at tile backs become water reservoirs.
For kitchen areas with steam and heat exposure, or balconies with direct sun and rain, use an adhesive with documented moisture resistance and thermal stability. Polymer-modified adhesives with a C2 or C2TE rating are the minimum for these zones.
Under-tile waterproofing membranes should be used in bathrooms before tiling, and the adhesive must be compatible with the membrane surface.
Key Performance Properties of a Vitrified Tile Adhesive
When reviewing adhesive specifications, these are the properties that matter most for vitrified tile applications:
Polymer Modification
All adhesives for vitrified tiles should be polymer-modified. The polymer additive improves adhesion to low-porosity surfaces, adds flexibility, and improves water resistance. Without polymer modification, the adhesive relies entirely on mechanical keying which vitrified tiles do not provide.
Open Time and Adjustability
Open time is the window between spreading the adhesive and placing the tile, within which the adhesive retains full bond capability. For large format vitrified tiles, a longer open time (20–30 minutes) is important because back-buttering and careful positioning take time. Adhesives that skin over quickly are unsuitable for large tile installation.
Slip Resistance for Wall Applications
Non-sag (anti-slip) adhesive is essential for wall tile applications. Without it, tiles slide downward as the adhesive cures, disrupting joint alignment and bond coverage. Wall adhesives carry a specific "T" designation in the IS 15477 classification system.
Back-Buttering Compatibility
For large format tiles, the adhesive must be suitable for application on both the substrate and the tile back simultaneously. Not all adhesives are formulated for this dual-application method. Confirm this in the product's technical data sheet before specifying.
Standard Compliance
Indian tile adhesives should be referenced against IS 15477, which classifies adhesives by type (C = cementitious), performance grade (1 or 2), and special characteristics (T = non-sag, E = extended open time, F = fast-setting). International reference standards include EN 12004. Confirm the product's classification from its published technical data sheet.
Vitrified Tile Fixing — Mortar vs Tile Adhesive
The table below compares fixing methods across the four parameters that matter most on site:
Parameter | Cement Mortar | Ordinary Tile Adhesive | Polymer-Modified Adhesive | Flexible Adhesive (C2TE) |
|---|---|---|---|---|
Bond Strength | Low (0.3–0.5 MPa) | Moderate (≥0.5 MPa) | High (≥1.0 MPa) | Very High (≥1.0 MPa + deformability) |
Vitrified Tile Compatibility | Poor – fails to bond low-porosity surface | Limited – works for small tiles only | Good – suitable for most vitrified sizes | Excellent – large format, exterior, wet areas |
Failure Risk | High – hollow sound, debonding common | Moderate – edge lifting under stress | Low – consistent bond with proper coverage | Very Low – accommodates movement & thermal stress |
Long-Term Performance | Degrades with moisture & thermal cycling | Acceptable for interior floors | Reliable for internal floors and walls | Best for exterior walls, high-moisture, large tiles |
Recommended Use | Not recommended for vitrified tiles | Small vitrified tiles, dry interior floors | Standard vitrified tiles, internal areas | Large format, exterior facades, wet rooms |
FAQ's
1. Can cement mortar be used for vitrified tiles?
No. Cement mortar and cement slurry are not suitable for vitrified tiles. Vitrified tiles have a water absorption rate below 0.5%, which means their surface offers no porosity for mortar to key into. Cement slurry will appear to bond initially but will debond under thermal movement, load, or moisture exposure, often within the first year. Polymer-modified tile adhesive is the correct fixing medium for all vitrified tile applications.
2. Which adhesive is best for large vitrified tiles?
Large format vitrified tiles (800×800 mm and above, including slabs) require a C2TE-rated polymer-modified tile adhesive, one that offers high bond strength (≥1.0 MPa), deformability (S1), and extended open time (E) to allow back-buttering and proper positioning. Back-buttering, applying adhesive to both the substrate and the tile back is mandatory for tiles at this size to achieve the minimum 80% contact area required for structural bond integrity.
3. Is the same tile adhesive suitable for floor and wall vitrified tiles?
No. Floor and wall applications have different requirements. Wall adhesives must have anti-sag (non-sag) properties designated by the letter "T" in IS 15477 classification to prevent tiles from slipping during installation before the adhesive sets. Floor adhesives do not carry this requirement and are not suitable for vertical applications. Always use a wall-specific or combined adhesive product confirmed to have non-sag properties when fixing vitrified tiles on walls.
4. How thick should tile adhesive be for vitrified tiles?
For standard vitrified tile installation, the adhesive bed thickness is typically 3–6 mm after tile embedment. For uneven substrates, this may go up to 10–12 mm depending on the adhesive product's maximum bed thickness rating. For large format tiles with back-buttering, the combined adhesive layer (substrate + tile back) should still fall within the product's specified range. Never use adhesive as a levelling screed, substrates should be made flat before tiling.
5. Does vitrified tile adhesive work on existing tiles?
It can, but not all adhesives are rated for tile-on-tile (non-porous substrate) applications. The existing tiles must be fully bonded with no hollow areas, free of grease, wax, or sealants, and structurally sound. The surface should be abraded or keyed to improve adhesion. Use an adhesive specifically confirmed for tile-on-tile use in its technical data sheet. This is a common scenario in Indian renovation and retrofitting projects where removing existing tiles would damage the underlying structure.
Making the Right Adhesive Choice Saves Rework
Adhesive selection for vitrified tiles is a technical decision, not a product swap. The difference between a C1 and a C2TE adhesive is not marketing, it reflects measurable differences in bond strength, deformability, open time, and moisture resistance that directly determine whether your installation lasts five years or twenty.
The right choice comes down to three things: understanding the tile (size, format, back profile), understanding the substrate (concrete, plaster, old tiles), and understanding the application environment (interior, exterior, wet, dry, high thermal movement).
Getting these three right means fewer failures, fewer callbacks, lower lifecycle cost, and a site that holds up through monsoons and decades of use.
Need help selecting the right adhesive for your vitrified tile project? Contact Magicrete's technical experts for recommendations based on your tile size, substrate and site conditions.
One-Stop Solution for all your Construction Needs
Contact Us